All hosting plans at NityGity suggest that you can host more than one domain name in one hosting account. In this way you can host more websites and e-mail accounts without purchasing a new hosting account.
In order to add a new domain to your hosting account, you need to perform two basic steps – change the nameservers for the domain to our hosting ones and then add your domain name to the server your account is hosted on.
If you want to use PremiumDNS or any third-party nameservers, contact our support and we will add the domain from our side.
NOTE: All of NityGity shared hosting accounts share the same nameservers. Using one and the same domain as your main domain and as an addon for hosting services can cause DNS synchronization issues which may result in your website(s) occasional unavailability.
Follow the instructions below to achieve this goal:
Step 1 – Change the nameservers
To begin with, you will need to point your domain to our hosting nameservers (for Value/Professional/Ultimate/Business: dns1.nitygityhosting.com and dns2.nitygityhosting.com, for Reseller: your private nameservers or Reseller hosting nameservers specified in the Welcome Email).
Guidelines on how to change nameservers for shared plans for domains which are registered at NityGity can be found here.
If your domain is registered with a third-party registrar, contact their support and ask to change the nameservers for your domain to dns1.nitygityhosting.com and dns2.nitygityhosting.com.
Only those domains which are pointed to these nameservers can be added to your hosting account, otherwise, you will get the error message when adding an addon domain.
for cPanel paper_lantern theme: 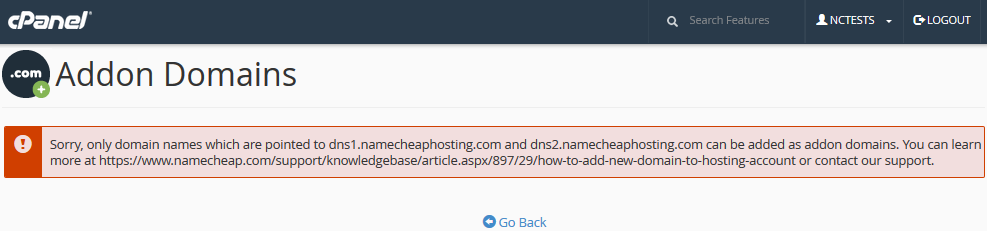
for cPanel x3 theme: 
Certain domain types cannot be added without changing the DNS first. In such cases, get in touch with our Hosting Support department via Live Chat or Ticket, and we either manually add the domains for you or disable the server rule to make the adding possible on your side.
Step 2 – Add the new domain as an Addon Domain
for cPanel paper_lantern theme
for cPanel x3 theme
for cPanel paper_lantern theme:
Once the domain name is pointed to correct nameservers, you can add it as an addon in your cPanel.
1. Log into your cPanel. (Please check this KB section if you have any issues with login)
2.Navigate to the Domains section > the Addon Domains menu: 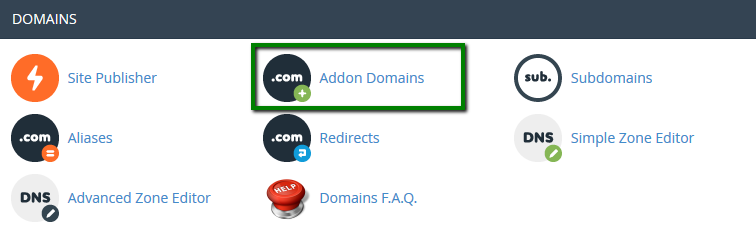
3. Enter the necessary information in the Create an Addon Domain section.
New Domain Name: domain name you wish to add as an addon
When adding an addon domain, make sure that there are no extra spaces before and after it, this is the most common cause of That is not a valid domain error.
Subdomain: will be filled automatically
Document Root: will be filled automatically
If you wish to create FTP account for your domain, checkmark Create an FTP account associated with this Addon Domain option.
FTP Username: will be filled automatically
Password: password for the associated FTP account
Password (Again): repeat the password 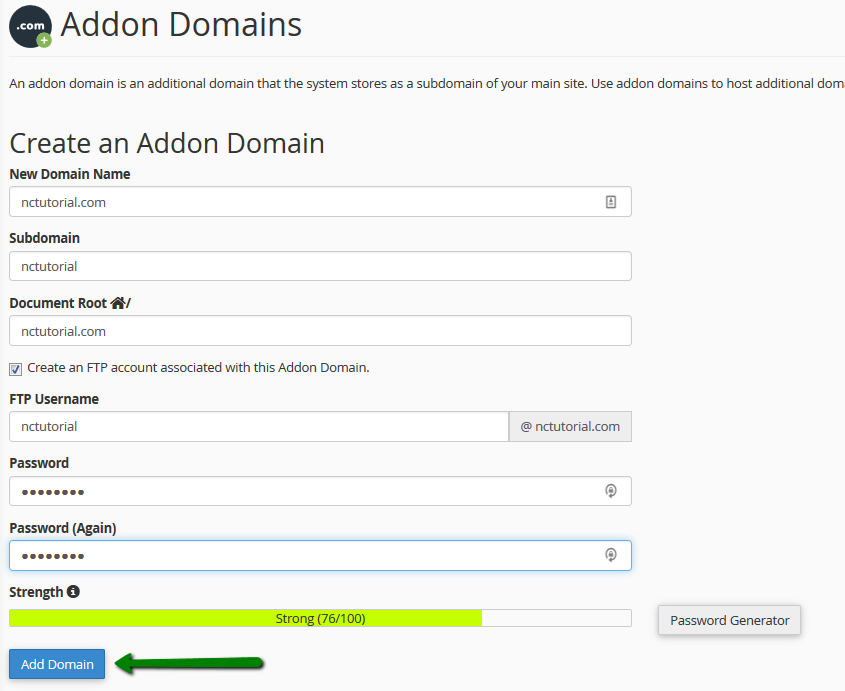
4. Click Add domain.
You may now upload content for your new domain into the corresponding document root. More information on how to upload your site can be found here.
If you wish to create an email account for the newly added domain, feel free to refer to this guide.
If you wish to remove an addon domain
Should you need to remove an addon domain, go to the Addon domains menu > Modify Addon Domain. Click on Remove to proceed: 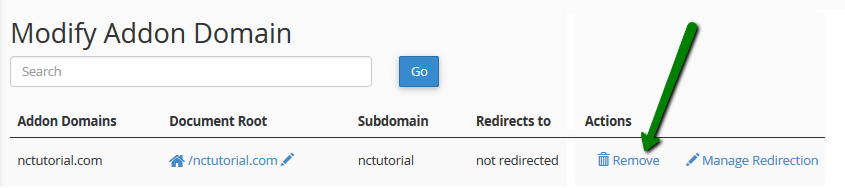
Check the Delete the associated FTP account option if you wish to delete the FTP account for your addon domain from the FTP Accounts menu in your cPanel, then click Remove: 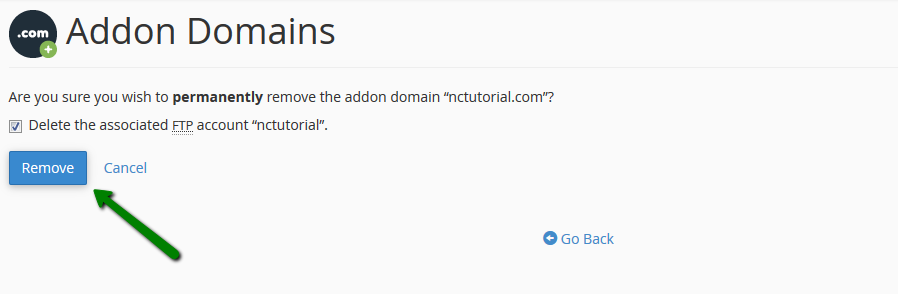
NOTE: The document root as well as the content associated with the removed addon domain will still be present in your File Manager, so if you wish these files to be deleted as well, you will need to remove the corresponding folder from File Manager manually.
for cPanel x3 theme:
Once the domain name is pointed to correct nameservers, you can add it as an addon in your cPanel.
1. Log into your cPanel. (Please check this KB section if you have any issues with login)
2.Navigate to the Domains section> Addon Domains: 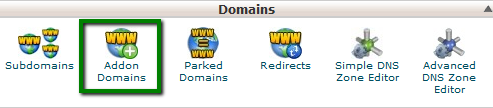
3. Enter the necessary information in the Create an Addon Domain section.
New Domain Name: domain name you wish to add as an addon
When adding an addon domain, make sure that there are no extra spaces before and after it, this is the most common cause of That is not a valid domain error.
Subdomain or FTP Username: will be filled automatically
Document Root: will be filled automatically
Password: password for the associated FTP account
Password (Again): repeat the password 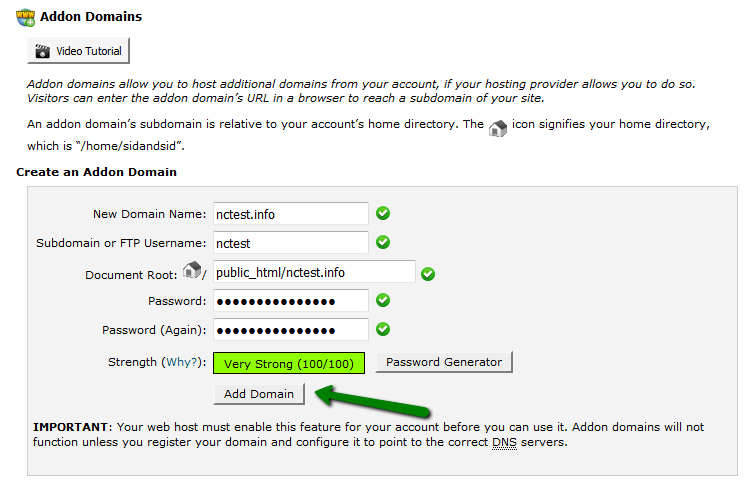
4. Click Add domain.
You may now upload content for your new domain into the corresponding document root. More information on how to upload your site can be found here.
If you wish to create an email account for the newly added domain, feel free to refer to this guide.
If you wish to remove an addon domain
Should you need to remove an addon domain, go to the Addon domains menu > Modify Addon Domain. Click on Remove to proceed: 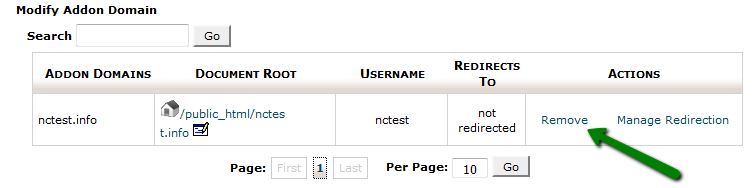
Check the Remove the associated FTP account option if you wish to delete the FTP account for your addon domain from the FTP Accounts menu in your cPanel, then click Remove: 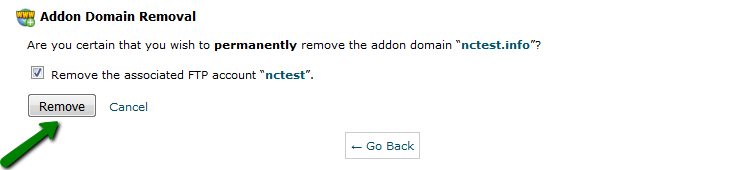
NOTE: The document root as well as the content associated with the removed addon domain will still be present in your File Manager, so if you wish these files to be deleted as well, you will need to remove the corresponding folder from File Manager manually.
That's it!
Need any help? Contact our HelpDesk